Introduction: How to make 3d render of product for E-commerce
In today’s hyper-competitive digital marketplace, the visual presentation of your products isn’t just important—it’s the decisive factor between a sale and a bounce. Traditional product photography, while effective, comes with significant limitations: high costs, logistical hassles, physical sample requirements, and an inability to showcase infinite variations. Enter 3D product rendering, a transformative technology that is reshaping how brands design, market, and sell online.
A 3D render is a digitally generated two-dimensional image or animation created from a three-dimensional model using specialized computer software. In ecommerce, this technology allows you to create photorealistic, interactive, and highly customizable visual assets of your products without the need for a physical photoshoot. The global 3D rendering market, valued at over $2.5 billion, is projected to grow at a CAGR of more than 20%, driven largely by ecommerce and advertising demands.
This comprehensive guide will serve as your definitive roadmap. Whether you’re a solo entrepreneur, a marketing manager, or a brand owner, you’ll learn the complete process—from initial concept to final, high-converting asset. We’ll demystify the technical aspects, provide actionable step-by-step strategies, and reveal the expert insights that can elevate your product presentation above 90% of your competitors. By the end, you’ll understand not just how to make a 3D render, but how to leverage it as a core strategic tool for growth.
Understanding 3D Product Rendering: Main Concepts and Workflow
What is 3D Product Rendering?
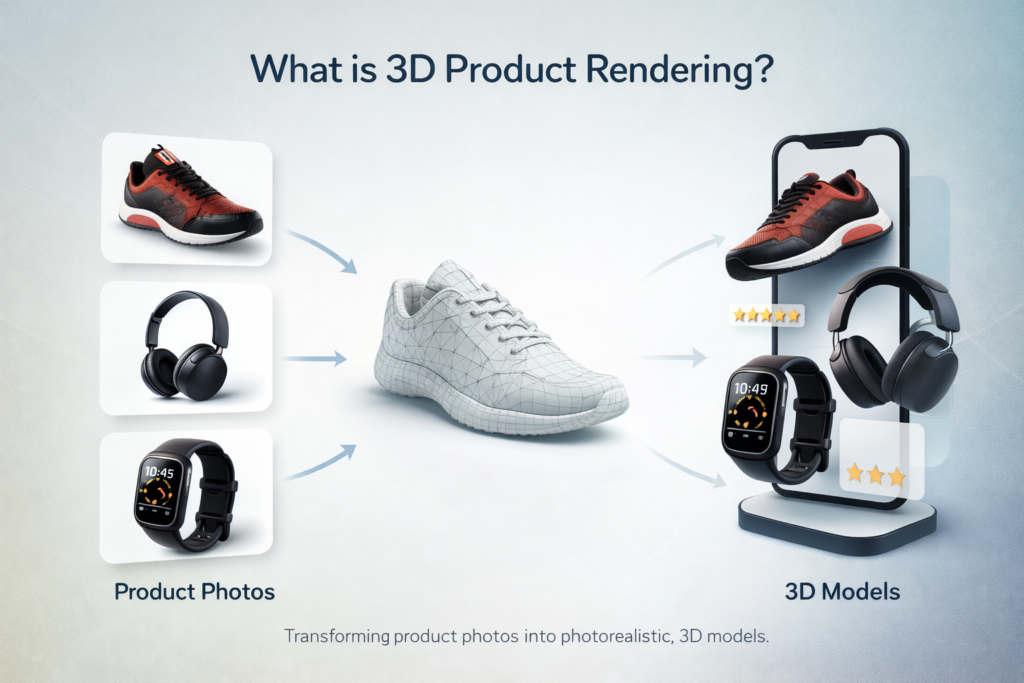
At its essence, 3D rendering is the process of converting a 3D wireframe model into a 2D image with photorealistic attributes. Think of it as the digital equivalent of setting up a perfect photo studio, but with god-like control over every single variable: lighting that never changes, materials that behave perfectly, and angles that are impossible with a physical camera.
The process hinges on two foundational elements: the 3D model (a mathematical representation of the object’s geometry) and the render engine (software that calculates how light interacts with that model’s surfaces, textures, and materials to produce the final image). The fidelity of the final render depends on the quality of both.
The Standard 3D Rendering Pipeline for Ecommerce
A professional 3D rendering project follows a structured pipeline. Understanding this workflow is crucial for planning, budgeting, and communicating with artists or agencies.
- Briefing & Concept: Defining the product, target audience, visual style (clean studio, lifestyle context), required shots (angles, exploded views), and technical specifications (resolution, format).
- 3D Modeling: Creating the digital geometry of the product based on technical drawings, CAD data, or physical measurements. This stage defines the shape and form.
- Texturing & Material Application: This is where realism is born. Artists apply digital materials (e.g., brushed aluminum, glossy plastic, woven fabric) by assigning texture maps for color, roughness, metallicity, and surface details like scratches or fingerprints.
- Lighting & Scene Setup: Mimicking real-world physics by setting up virtual light sources (HDRI environment maps, area lights, sun light) to highlight product details and create mood.
- Rendering: The computational heavy-lifting where the engine processes millions of light rays to generate the initial image(s). This can take from minutes to days per frame, depending on complexity and quality.
- Post-Processing: Using software like Adobe Photoshop to fine-tune the raw render—adjusting contrast, color grading, adding subtle backgrounds, or compositing multiple renders.
Key Technologies and File Formats
- Modeling Software: Autodesk 3ds Max, Blender (open-source and powerful), Cinema 4D, SketchUp.
- Rendering Engines: V-Ray, Arnold, Corona Renderer, Redshift, Cycles (in Blender). These are often integrated into the modeling software.
- Critical File Formats:
- OBJ & FBX: Universal formats for 3D model geometry and basic material data.
- GLTF/GLB: The “JPEG of 3D,” ideal for web use, especially for interactive 3D viewers.
- USDZ: Apple’s format for iOS AR experiences.
- PNG with Alpha Channel: For renders needing transparent backgrounds.
- EXR: A high-dynamic-range format that preserves immense lighting data for professional post-processing.
The Unbeatable Benefits of 3D Renders for Your Online Store
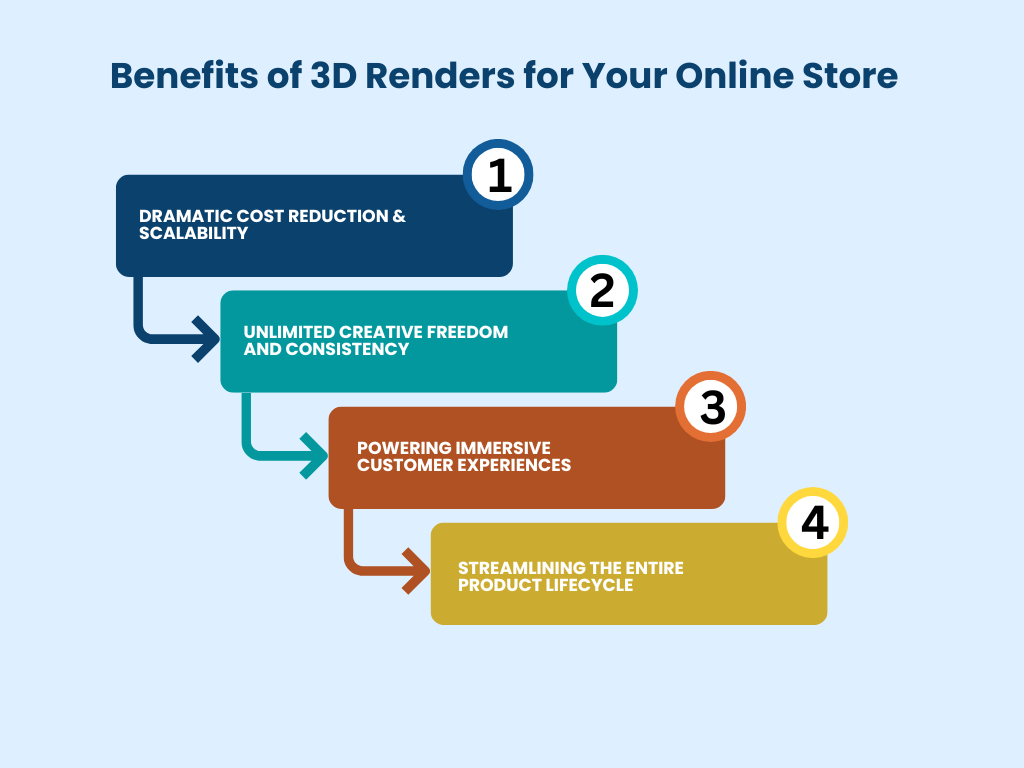
Moving to 3D rendering isn’t just an aesthetic upgrade; it’s a strategic business decision with measurable ROI.
1. Dramatic Cost Reduction & Scalability
While the initial investment in 3D modeling can be significant, the long-term economics are unbeatable. Once a high-fidelity 3D model is created, you can generate an unlimited number of images, colors, configurations, and scenes for a marginal additional cost. Need to showcase the same sofa in 50 different fabric swatches? With 3D, it’s a matter of swapping a texture file, not re-upholstering and re-shooting 50 physical sofas. This scalability is revolutionary for catalogs with high product variability.
2. Unlimited Creative Freedom and Consistency
3D rendering removes all physical constraints. You can place a watch in the depths of space, create an exploded view to show internal components, or produce a perfect 360° spin. Furthermore, lighting and camera settings are saved and perfectly replicable, ensuring absolute visual consistency across your entire catalog—a feat nearly impossible with traditional photography across different shoot days.
3. Powering Immersive Customer Experiences
Static images are passive. 3D enables interactive experiences that actively engage customers.
- Interactive 3D Viewers: Allow users to rotate, zoom, and inspect products from every angle as if holding them, significantly reducing purchase uncertainty. Platforms like Amazon AR View and Shopify’s 3D Model support are built for this.
- Augmented Reality (AR): Let customers “place” your product in their own space using their smartphone camera. For furniture, decor, and appliances, this directly addresses the “Will it fit?” and “How will it look?” questions, leading to a 94% higher conversion rate for products with AR, according to Shopify data.
- Configuration & Personalization: Allow buyers to customize products in real-time—changing colors, materials, and components—and see a photorealistic render of their unique creation instantly. This is a powerful tool for brands in apparel, automotive, and luxury goods.
4. Streamlining the Entire Product Lifecycle
3D assets are valuable long before the product hits the online store. They are used in:
- Design & Prototyping: Visualize and iterate designs before costly manufacturing.
- Marketing & Pre-Launch: Create stunning visuals for social media, ads, and crowdfunding campaigns without a finished product.
- Manufacturing & Technical Documentation: Use the accurate 3D model for technical sheets and assembly instructions.
Your Step-by-Step Guide to Creating a 3D Product Render
Here is a detailed, actionable roadmap from zero to a finished, high-quality render.
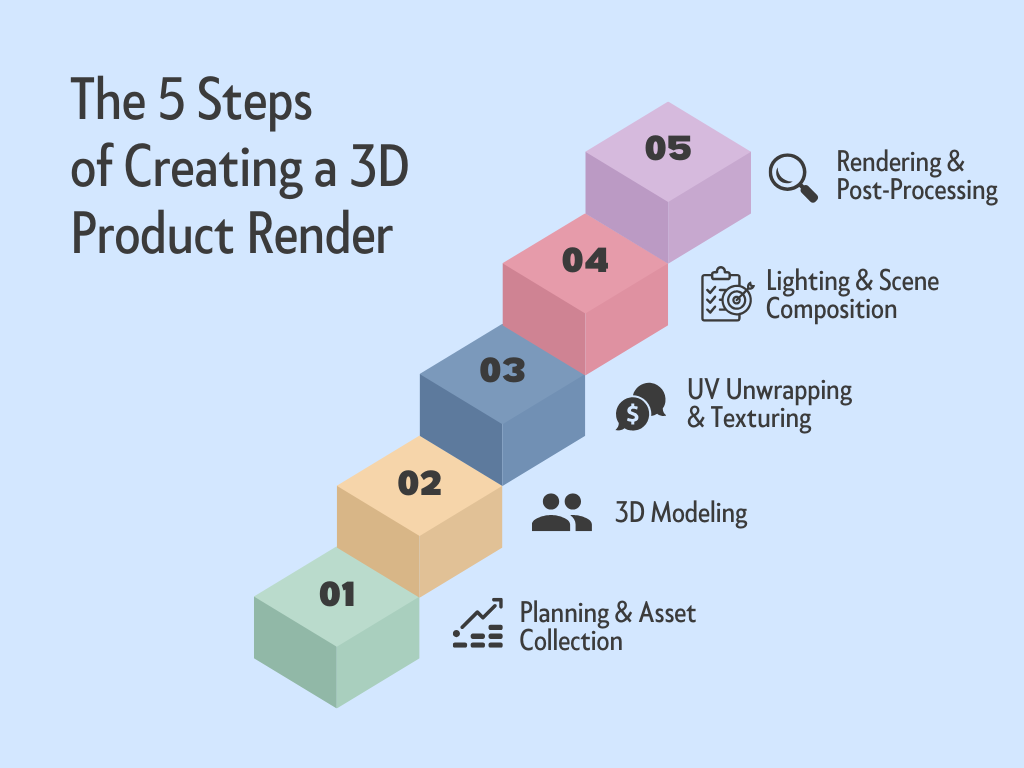
Step 1: Planning & Asset Collection (The Blueprint)
Goal: Gather everything needed to create an accurate and on-brand model.
- Reference Materials: Collect high-resolution photos from every angle (front, back, sides, top, bottom, detail shots). Orthographic views (flat, without perspective) are gold.
- Technical Drawings: If available, CAD files (STEP, IGES) or dimensioned blueprints are the most accurate starting points.
- Physical Samples: If possible, having the product on hand allows for perfect color matching and material study.
- Creative Brief: Define the final output: image resolution, background (pure white, contextual), required angles, and any special shots (cutaway, exploded view).
Step 2: 3D Modeling (Building the Digital Sculpture)
Goal: Create the precise digital geometry of the product.
- Method Choice:
- Polygon Modeling: The most common method, manipulating vertices, edges, and faces to build form. Ideal for organic shapes and complex products.
- CAD-Based Modeling: Starting from engineering CAD data ensures 100% dimensional accuracy for mechanical parts, electronics, and furniture.
- Photogrammetry: Using specialized software to generate a 3D model from dozens of overlapping photographs. Great for scanning existing objects but may require cleanup.
- Best Practice: Model with clean topology (efficient polygon flow) and proper scale. This makes texturing and rendering smoother and is essential for any future animation or interactive use.
Step 3: UV Unwrapping & Texturing (The Skin and Surface)
Goal: Prepare the model for painting and apply realistic materials.
- UV Unwrapping: This is the process of “flattening” the 3D model’s surface into a 2D map so that 2D texture images can be wrapped onto it correctly. Think of it like peeling an orange and laying the skin flat.
- Material Creation (The Key to Realism):
- Use a PBR (Physically Based Rendering) workflow. PBR materials behave like real-world materials by using a set of scientifically accurate maps:
- Albedo/Diffuse Map: The base color or pattern.
- Roughness Map: Defines if a surface is matte (rough) or glossy (smooth).
- Normal Map: Simulates small surface detail (like fabric weave or scratches) without adding geometry.
- Displacement/Height Map: Actually modifies the geometry for true depth on surfaces like knurling or deep grooves.
- Source high-quality textures from libraries like Poliigon, Texturehaven, or Substance Source.
- Use a PBR (Physically Based Rendering) workflow. PBR materials behave like real-world materials by using a set of scientifically accurate maps:
Step 4: Lighting & Scene Composition (Setting the Stage)
Goal: Illuminate the product to be attractive, clear, and mood-appropriate.
- Lighting Setups:
- Studio Lighting (3-Point): The classic setup: a Key light (main bright light), a Fill light (softens shadows), and a Back/Rim light (separates product from background).
- HDRI Lighting: Using a 360° high-dynamic-range image to light the scene. This provides incredibly natural and complex lighting reflections, as if the product is in a real environment.
- Camera Settings: Use a virtual camera with realistic settings (focal length, depth of field) to avoid a “CGI look.” A focal length between 50mm and 85mm often mimics the natural perspective of the human eye.
Step 5: Rendering & Post-Processing (The Final Touch)
Goal: Compute the final image and apply finishing polish.
- Rendering Settings: Balance quality and time. Key settings include sample count (higher = less noise, longer render), resolution (300 DPI for print, 72-150 DPI for web), and light bounces.
- Render Passes: For advanced control, render separate passes (Beauty, Shadow, Reflection, Specular) and composite them in post-processing.
- Post-Processing in Photoshop:
- Adjust levels, curves, and contrast.
- Color grade to match brand aesthetics.
- Add subtle lens effects (vignetting, chromatic aberration) for photographic feel.
- Clean up any minor rendering artifacts.
- Composite onto a clean background or into a lifestyle scene.
Common Mistakes in 3D Product Rendering and How to Avoid Them
Even with great tools, pitfalls can undermine realism and cost you time and money.
- The “Too Perfect” Look (Uncanny Valley):
- Mistake: Creating flawlessly smooth surfaces, perfect edges, and uniform materials. Reality has imperfections.
- Solution: Introduce subtle imperfections. Add a slight roughness variation, micro-scratches on metal, fabric lint, or fingerprints on glass. Use grunge maps sparingly to break up uniformity.
- Unrealistic Lighting & Shadows:
- Mistake: Using a single, harsh light source that creates dark, unnatural shadows. Or neglecting global illumination (how light bounces).
- Solution: Use multiple light sources or, better yet, HDRI environment maps for natural, diffuse lighting. Ensure shadows have soft edges and appropriate darkness. Study real-world product photography lighting setups.
- Poor Scale and Proportion Context:
- Mistake: Placing a product in a scene with no recognizable objects, making its size ambiguous.
- Solution: Include common context objects (a human hand, a coin, a keyboard, a plant) in at least one hero shot to instantly communicate scale.
- Ignoring the Power of Composition:
- Mistake: Placing the product dead-center in every shot with no dynamic angles or negative space.
- Solution: Use the rule of thirds, leading lines, and varied camera angles (hero shot, detail shot, context shot) to create visual interest and guide the viewer’s eye.
- Overcomplicating the Scene:
- Mistake: Adding excessive decorative elements, dramatic backgrounds, or props that distract from the product itself.
- Solution: Remember the primary goal: to showcase the product clearly. Start with a clean, white-background studio shot. Use lifestyle scenes to complement, not compete.
Expert Tips, Best Practices, and Future Trends
Expert Tips for Maximal Impact
- Invest in the Model First: The 3D model is your foundational asset. Spend time and resources here. A perfect model with average textures will look better than a poor model with perfect textures.
- Master Material Libraries: Build and curate a library of your most-used PBR materials (your brand’s specific plastics, metals, fabrics). This ensures consistency and speeds up future projects.
- Render at Higher Resolutions: Always render your master files at a higher resolution than needed (e.g., 4K or 6K). You can always scale down for web use, but scaling up for a billboard later is impossible without a re-render.
- Validate with Real Photos: When possible, compare your final render side-by-side with a photo of the real product under similar lighting. This is the ultimate test of photorealism.
The Future: Real-Time Rendering and AI
The frontier of 3D is moving towards instant, interactive photorealism.
- Real-Time Engines (Unreal Engine, Unity): Traditionally for games, these are now used for high-end product visualization. They allow for instant changes to lighting, materials, and angles with no render wait time, enabling live client presentations and hyper-realistic configurators.
- AI-Powered Tools: AI is emerging to accelerate tedious tasks. NVIDIA’s Canvas can turn simple brush strokes into photorealistic landscapes for backgrounds. AI denoisers clean up low-sample renders in seconds. Tools like Kaedim are beginning to convert 2D images directly into 3D models, though human refinement is still required for commercial quality.
Integration with Ecommerce Platforms
Ensure your 3D assets are built for your tech stack. Most modern platforms support 3D and AR.
- Shopify: Natively supports GLB/GLTF files for interactive 3D viewers. Apps like Vectary and 3DPM can enhance functionality.
- WooCommerce/Magento: Utilize plugins that support WebGL-based 3D viewers.
- Amazon: Supports 3D/AR through the Amazon AR View program for eligible categories.
Frequently Asked Questions (FAQ)
Q1: How much does it cost to create a 3D product render?
A: Costs vary widely based on complexity. A simple product (like a mug) might cost $150-$300 per model, with renders at $50-$100 each. A highly complex product (like a detailed bicycle or furniture with intricate fabrics) can range from $1,000 to $5,000+ for the model. Remember, the model is the main cost; additional renders/colors are relatively inexpensive.
Q2: Is 3D rendering cheaper than traditional photography?
A: For a single product and a single image, photography might be cheaper. However, 3D becomes vastly more cost-effective when you need multiple angles, color variants, configurations, or plan to use the asset across marketing materials, manuals, and AR. The scalability of 3D offers a far superior long-term ROI.
Q3: What software is best for a beginner to start with?
A: Blender is the undisputed champion for beginners and professionals alike. It’s completely free, open-source, and has a massive, supportive community. Its comprehensive toolset includes modeling, sculpting, texturing, animation, and two built-in rendering engines (Eevee for real-time, Cycles for photorealism).
Q4: How long does it take to create a 3D render?
A: The timeline depends on complexity and artist experience. A simple product model might take 4-8 hours to create. Texturing and lighting can take another 2-4 hours. The final render computation can take from 20 minutes to several hours per image. A complete project for one product with 3-5 renders can take 2-5 business days.
Q5: What file format should I request for my ecommerce website?
A: For interactive 3D viewers, request a GLB or GLTF file. For standard image displays, request high-resolution PNG files with a transparent alpha channel (for flexibility) and WebP versions for faster page loading. Also, archive the original project files and high-res EXR/TIFF renders for future use.
Q6: Can I create 3D renders from just a photograph?
A: Not directly. A single photograph lacks the 3D depth information needed for a model. However, you can use it as a reference image to model from scratch. Techniques like photogrammetry use dozens of overlapping photos from all angles to generate a basic 3D model, which usually requires significant cleanup by a 3D artist for commercial use.
Q7: What’s the difference between 3D rendering and CGI?
A: CGI (Computer-Generated Imagery) is the broad umbrella term for any image or animation created with computer software. 3D rendering is a specific process within CGI that focuses on generating the final 2D image from a 3D scene. All 3D renders are CGI, but not all CGI is 3D rendering (2D animation is also CGI).
Q8: Do I need a powerful computer for 3D rendering?
A: For professional work, yes. Rendering is computationally intensive. Key components are a powerful CPU (like AMD Ryzen 9/Threadripper or Intel Core i9) and a high-end GPU (NVIDIA RTX series is ideal). Plenty of RAM (32GB minimum, 64GB+ recommended) and fast SSD storage are also crucial. Many professionals also use cloud rendering farms like RebusFarm or GarageFarm to offload heavy final renders.
Q9: How does 3D rendering work with Augmented Reality (AR)?
A: The 3D model you create for rendering is the exact same asset used for AR. It is exported in a mobile-friendly format (like USDZ for iOS or GLB for Android/web) and integrated into an AR app or web framework (like Apple’s ARKit, Google’s ARCore, or 8th Wall). The model is then superimposed into the user’s camera view in real-time.
Q10: Can 3D renders be used for physical print catalogs?
A: Absolutely. In fact, they are ideal for print because they offer ultimate control and consistency. Renders should be created at a high resolution (usually 300 DPI at the final print size) and delivered in a print-ready format like TIFF or high-quality JPEG. Many automotive and furniture brands have used fully rendered images in their print marketing for years.
Conclusion:
The shift from traditional photography to 3D product rendering is more than a trend; it’s a fundamental evolution in ecommerce visualization. It empowers brands with unprecedented creative control, operational scalability, and the ability to deliver immersive, interactive shopping experiences that directly combat online purchasing hesitancy.
Your key takeaways should be:
- Start with Strategy: Define your use case. Is it for simple white-background swaps, interactive viewers, or full AR? This guides your investment.
- Quality is Foundational: Invest in creating a pristine, accurate 3D model. This asset will pay dividends across marketing, sales, and even manufacturing for years.
- Embrace the Workflow: Understanding the pipeline—modeling, texturing, lighting, rendering—makes you an informed partner, whether you’re doing it yourself or briefing an agency.
- Prioritize the Customer Experience: Use your 3D assets to solve customer problems: show every angle, enable customization, and let them visualize the product in their space with AR.
The future of ecommerce is visual, interactive, and personalized. 3D rendering is the engine driving that future. Begin by auditing one key product in your catalog. Model it, render it, and integrate it interactively on your product page. Measure the impact on engagement, time-on-page, and ultimately, conversion. The data will clearly chart your course forward into the next dimension of digital commerce.
- Blender Foundation – The official site for Blender software and tutorials.
- Khronos Group – glTF Overview – Technical specifications and benefits of the GLTF file format.
- Shopify Commerce Trends: The Future of 3D & AR Commerce – Data and insights on the impact of 3D/AR in ecommerce.
For advanced ecommerce growth strategies, technical insights, and scalable content frameworks, explore professional resources at rankifycontent.com.